Thursday, June 12, 2014

YZ80A Brake Rod Refurbish

Renewing The Brake Rod and Arm

We just couldn't stand to see this dirty, rusty brake rod making it's way onto the bike as it is. Buy a new one? No, just refurbish the original.


Yes, these pictures are in the post just before it except...

this is how it looks now and we think it will definitely add to the finished bike.

As it happens so often, one refurbed part leads to doing another to make things look best. The brake backing plate stuck out like a sore thumb when the refurbished brake rod and arm were held next to it. Probably to shiny for stock but wait until it ages. Now this will probably lead to getting the wheel spokes looking better. See, this is how you can wind up over spending on a project unless you know how to use affordable resources and do work yourself.

Monday, June 9, 2014

How to Dress Up Screws

Dressing Up Screw Heads

Just a quick tip for dressing up those screw heads that get buggered up from use. People have asked me how it's done. Frequent turning or the wrong size screw driver can gall up the top of the screw head with little sharp edges. They also get grungy looking with age, you can buy new ones or try to save them. I try to save them whenever I can, especially ones that can be readily seen after assembly.


Take a file and file down the sharp edges left from screwdriver slipping from the slot, holding the screw and file in your hands works better but I had to hold the camera.

People have also asked how I clamp the screws and bolts in a vice without messing up the threads. Get several different sizes of rubber fuel line, insert the screw or bolt,

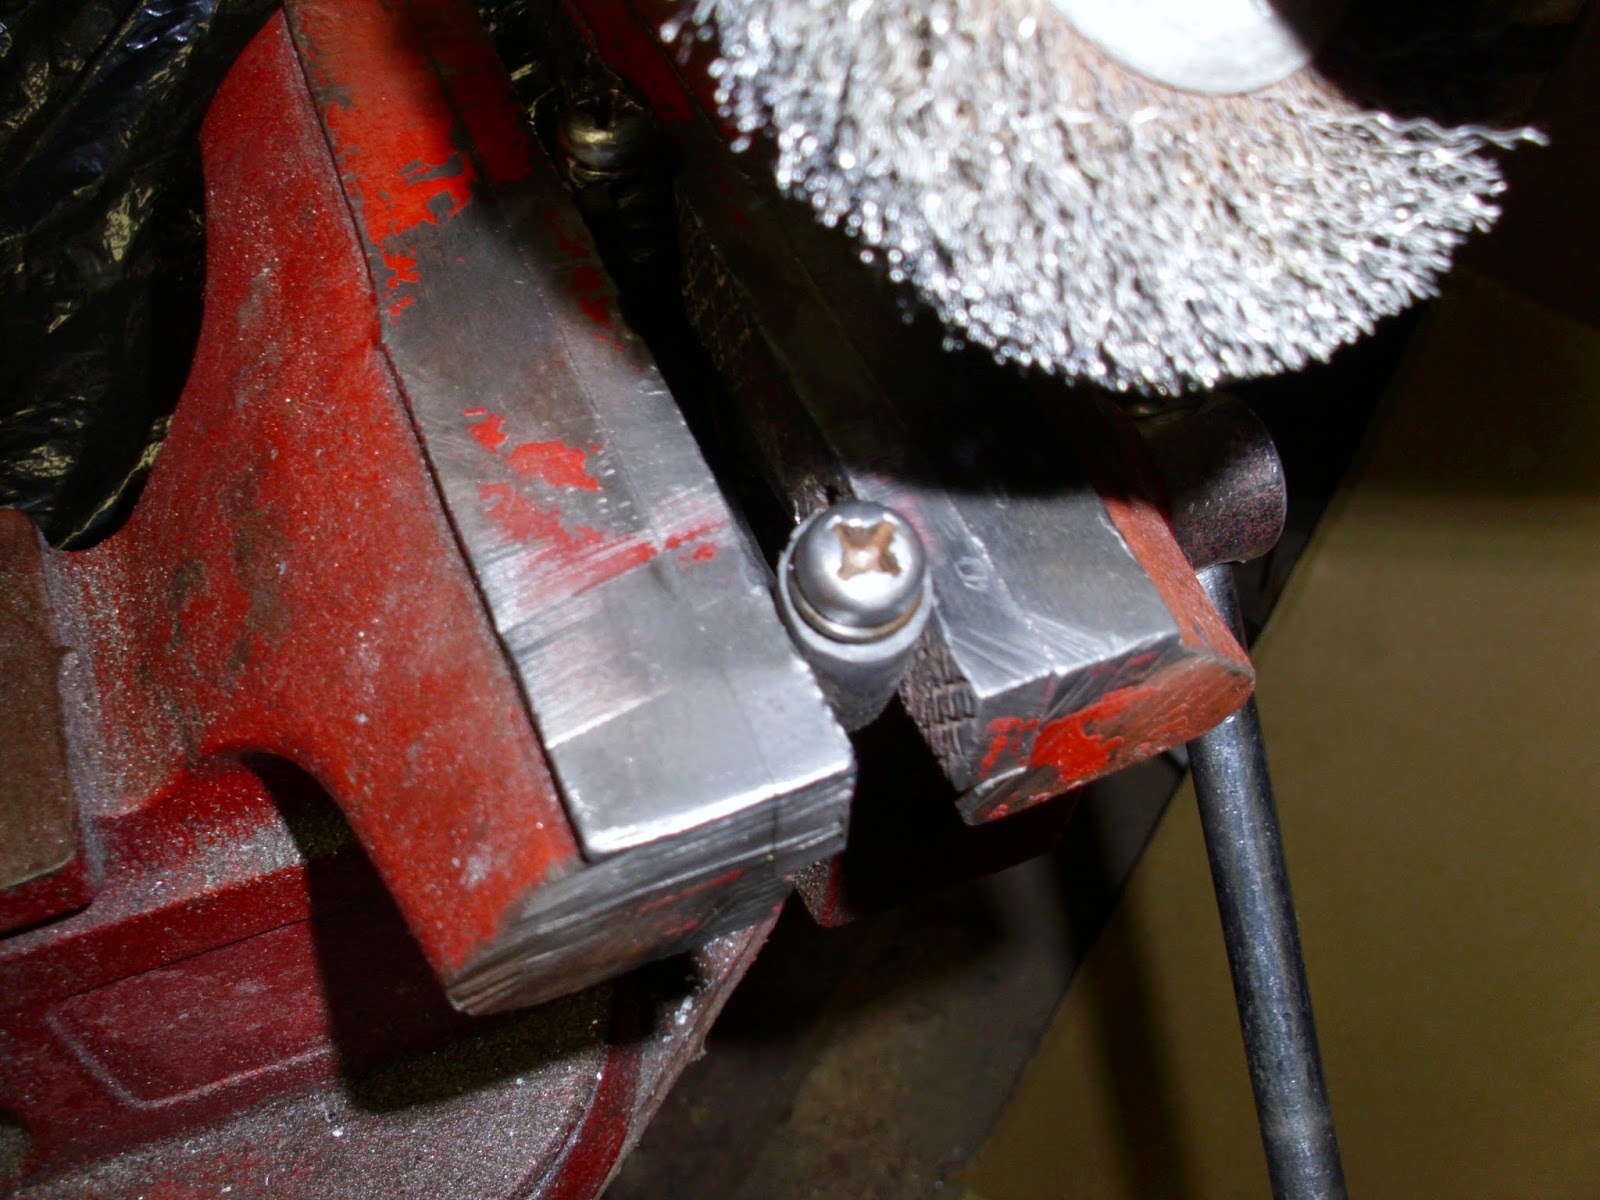
now clamp in the vice without worry of messing up the threads. Use some WD-40 or the like and squirt some inside the slots and on the heads; let soak a few seconds. Usually good to go by the time you grab your drill.

Use a drill with a wire wheel of your choice to clean up the heads. Don't clamp down on the vice like some gorilla, just nice and snug as the rubber hose squished against the threads keeps the screw or bolt from flying out or spinning. 

Use a small pointed tool to get down in the slot with a shop towel to remove any grime in there. To keep the heads looking good longer coat them with some Blue Magic, Mothers or your choice of metal polish. The screw head below looks almost new.

1990 YZ80 Airbox Cleaned Up

Refurbished YZ80A Air box.

Look at this air box, it's so nasty inside and out that it's a wonder if it'd ever been cleaned. You should see the filter that was in there. The whole thing was disassembled and given a good cleaning. The chrome metal retaining band on far left seems to be a factory mistake and made backwards. The recessed groove that by looking, should go over the rubber air boot to seal it to the air box housing, but when installed it is with groove up instead of down. In the picture it is not oriented with the air filter retaining ring, flip it in your mind and it goes together but as said the flange is wrong. Enlarge picture for closer view.


Here we have the air box all cleaned up and the rubber pieces look new again, even have the mud flap refurbed and installed. I keep my secret on how to do the rubber parts, and no it's not that product your thinking of.

Sunday, June 8, 2014

YZ80 Stage Three, Brake Linkage and swing arm links.

Brake and swing arm links


Showing here how the rear of the brake rod, brake arm, and wheel adjusters are installed. Also note the teeth on the sprocket. Both front and rear sprockets are worn out as was the chain; all three being replaced with new.


Front view of the rear brake rod and how it and brake lever is assembled.


Suspension link orientation for when we go to reassemble the swing arm. Also note the direction the pivot bolts are installed.


Just another picture so we can document the rear link assembly. When taken apart all the bushings and bearing will be cleaned and checked to be sure they are still in good condition. (Actually already passed this point and finished. Don't think any pictures were taken of the process.)

Taking 1990 YZ80 Apart #2

Baby Out Of The Cradle
I have made a lot of progress since the last posting, actually behind on the updates as we are in the reassembly and mundane stages now. Mundane is fixing, gathering new pieces as we come to them and/or refurbishing original parts.
First picture is not much more than the engine out and on the bench waiting further cleaning. In order to refinish would require a complete tear down... not sure we're going to do that as it runs and shifts great. 

Picture of the engine cradle, note that the rear engine mount bolt also doubles as the pivot point for swing arm.

As we tear down the rest of the YZ80A,  we slid the rear engine mount/swing arm pivot bolt back. Having that in helps when removing the rear wheel, also made it easier to wheel the bike out of the way while we tended to other removed parts.


Rear shot showing the shock before removal. Remember, plenty of pictures aids in reassembly process.


Removed the front forks after taking off the handle bars and top triple tree clamp. The grease in the bearing race was probably factory and had long ago lost any semblance to grease. What was left was fouled with years of dirt and was packed in and dry. Be very careful when removing the front end as the steering stem may slide out un-expectantly leaving you with ball bearings jumping all around the floor.

Looking at the steering neck and you can see how little grease was left here. Those bearings where running dry as a bone, lucky they weren't trashed.

Saturday, May 31, 2014

YZ80A 1990 Model Disassembly

Taking The YZ 80 Apart
Basically all I am doing here is taking the bike down to it's separate components.

I like to use a camera to document how and where parts go because I know I will forget. Below is a picture of how the overflow hose/tube (the yellowed one) from the radiator is routed. The bottom hose has been taken loose and is draining into a funnel back into the coolant jug. The fluid was new and only in the engine for break in period. 


In this picture the routing of the throttle cable and overflow radiator hose.

Here shows electronics from right side and throttle cable as it went behind the radiator itself. This picture will also aid in other items placement as can be seen for future reference.

Left side of the electronics and engine wires going to the stator/flywheel side in the engine. The exhaust pipe is gone but the hanger is still present. 
                                     

The air box has been removed and disassembled for cleaning. Using several ziplock bags and a sharpie marker to label and contain all the bits and bolts and screws etc as it comes off the bike.  Plastic containers are also used to put assemblies in with bagged items to keep together. I bet this box has never ever been cleaned form when the bike was new. It was damned nasty inside and out.  

Here the screwdriver is used as a pointer to show where the ground wire goes.

The front brake and the throttle assembly. See all those white speckles from someone's previous project overspray? That will clean up with some Goof Off spray. Shouldn't give away secrets of the trade but some things are just to great not to.  

Just showing the direction of one of the engine mount bolts (lower). It goes in from left side of bike.

This is the front mount from left side of engine/bike.


Removing A Handle Bar Grip for Reuse
Should have shown this when showing the throttle control and front brake lever. Anyway, to remove a handgrip, that you might want to save, if it's in good shape to reuse after refinishing your bars or putting on a different set of bars. Works on bicycles also. Take a vey small flathead screwdriver and carefully insert it between the grip and the handlebar...


next take some WD-40 with the straw, lever up the end of the grip just enough to get the tip of the straw in there and spray. Insert the driver a quarter way around and do the same. Let it sit for a minute. You should now be able to remove the grip with a twisting motion.

You can see the WD-40 swirls on the bars from the twisting of the grip. Comes off like buttah.

Now back from the commercial break. Lastly, this is the rear mount which also doubles as the swing arm pivot mount, it comes across from the right side of the bike. The other two bolts to the right are for the chain guide that protects the swing arm, this one will have to be replaced as it was worn through.


Tuesday, May 27, 2014

YZ 80 Engine Test Run

Test Run The YZ80

After getting the top end re-assembled we gave the nasty carburetor a bowl cleaning. This is how it looked before.


Filled the gear case with 10W-40 Racing oil, the proper amount is found on the engine case.


We put on the exhaust pipe, filled the radiator,


and the fuel tank and put in a couple of quarts of a slightly heavier fuel/oil mix to be sure top end was adequately lubed for break in.
The bike fired up after around fifteen kicks and run for five minutes at various RPM levels. No over revving here, just slowly bring up the engine revs and hold for a few seconds then let it idle down.  Cut it off to cool for fifteen to twenty minutes and did it again. After the first run and each cranking after she fires right off on two kicks or less once I figured out to give just a little bit of throttle while kicking it over. We did this several times to begin with. Finally it was taken for a little ride without putting it under a heavy load but also not lugging it around. After a couple times we got on it moderately going through the gears to be sure transmission was in working order. The next day I couldn't resist one good blast around on it before disassembly of the whole motorcycle, the little YZ 80 pulled the front wheel off the ground with no effort at all...much to my surprise as I didn't mean to do it. Back in the shop with it to begin the tear down process.