Saturday, May 31, 2014

YZ80A 1990 Model Disassembly

Taking The YZ 80 Apart
Basically all I am doing here is taking the bike down to it's separate components.

I like to use a camera to document how and where parts go because I know I will forget. Below is a picture of how the overflow hose/tube (the yellowed one) from the radiator is routed. The bottom hose has been taken loose and is draining into a funnel back into the coolant jug. The fluid was new and only in the engine for break in period. 


In this picture the routing of the throttle cable and overflow radiator hose.

Here shows electronics from right side and throttle cable as it went behind the radiator itself. This picture will also aid in other items placement as can be seen for future reference.

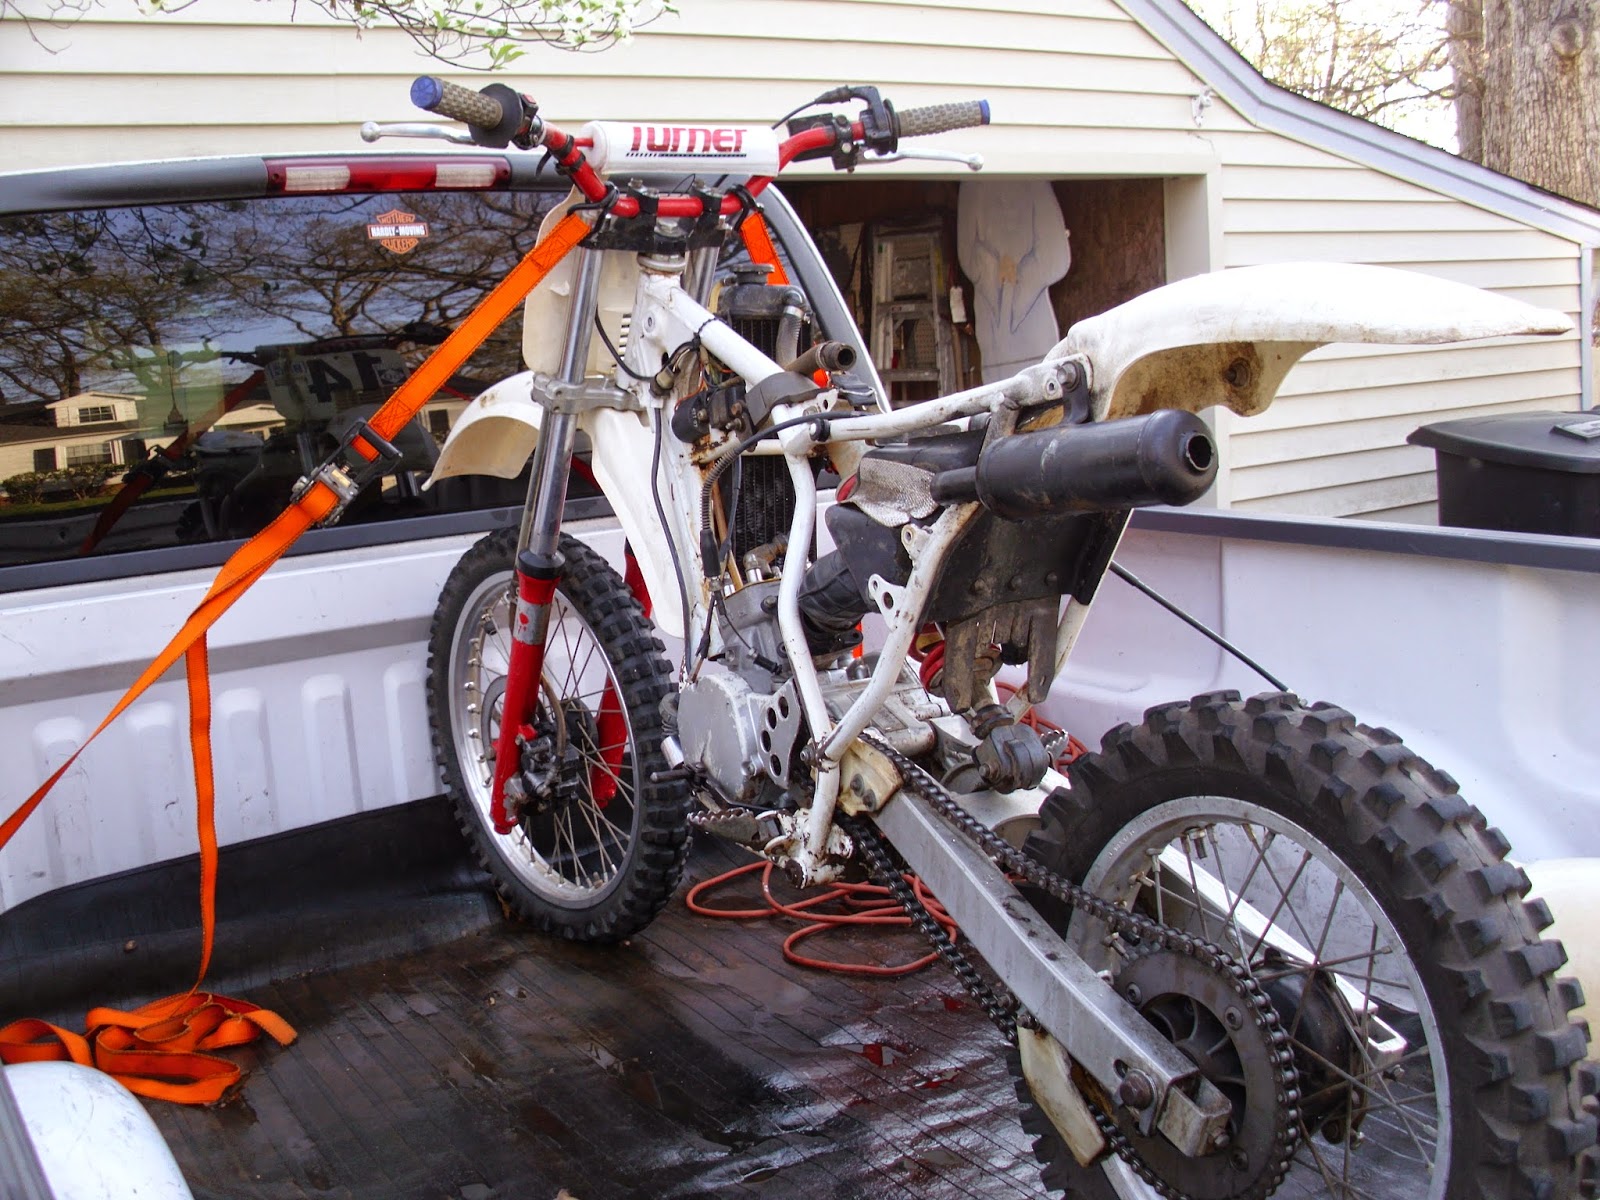
Left side of the electronics and engine wires going to the stator/flywheel side in the engine. The exhaust pipe is gone but the hanger is still present. 
                                     

The air box has been removed and disassembled for cleaning. Using several ziplock bags and a sharpie marker to label and contain all the bits and bolts and screws etc as it comes off the bike.  Plastic containers are also used to put assemblies in with bagged items to keep together. I bet this box has never ever been cleaned form when the bike was new. It was damned nasty inside and out.  

Here the screwdriver is used as a pointer to show where the ground wire goes.

The front brake and the throttle assembly. See all those white speckles from someone's previous project overspray? That will clean up with some Goof Off spray. Shouldn't give away secrets of the trade but some things are just to great not to.  

Just showing the direction of one of the engine mount bolts (lower). It goes in from left side of bike.

This is the front mount from left side of engine/bike.


Removing A Handle Bar Grip for Reuse
Should have shown this when showing the throttle control and front brake lever. Anyway, to remove a handgrip, that you might want to save, if it's in good shape to reuse after refinishing your bars or putting on a different set of bars. Works on bicycles also. Take a vey small flathead screwdriver and carefully insert it between the grip and the handlebar...


next take some WD-40 with the straw, lever up the end of the grip just enough to get the tip of the straw in there and spray. Insert the driver a quarter way around and do the same. Let it sit for a minute. You should now be able to remove the grip with a twisting motion.

You can see the WD-40 swirls on the bars from the twisting of the grip. Comes off like buttah.

Now back from the commercial break. Lastly, this is the rear mount which also doubles as the swing arm pivot mount, it comes across from the right side of the bike. The other two bolts to the right are for the chain guide that protects the swing arm, this one will have to be replaced as it was worn through.


Tuesday, May 27, 2014

YZ 80 Engine Test Run

Test Run The YZ80

After getting the top end re-assembled we gave the nasty carburetor a bowl cleaning. This is how it looked before.


Filled the gear case with 10W-40 Racing oil, the proper amount is found on the engine case.


We put on the exhaust pipe, filled the radiator,


and the fuel tank and put in a couple of quarts of a slightly heavier fuel/oil mix to be sure top end was adequately lubed for break in.
The bike fired up after around fifteen kicks and run for five minutes at various RPM levels. No over revving here, just slowly bring up the engine revs and hold for a few seconds then let it idle down.  Cut it off to cool for fifteen to twenty minutes and did it again. After the first run and each cranking after she fires right off on two kicks or less once I figured out to give just a little bit of throttle while kicking it over. We did this several times to begin with. Finally it was taken for a little ride without putting it under a heavy load but also not lugging it around. After a couple times we got on it moderately going through the gears to be sure transmission was in working order. The next day I couldn't resist one good blast around on it before disassembly of the whole motorcycle, the little YZ 80 pulled the front wheel off the ground with no effort at all...much to my surprise as I didn't mean to do it. Back in the shop with it to begin the tear down process.

Monday, May 5, 2014

1990 YZ80 Top End Assembly

Assembly of the Piston and Cylinder of the YZ80


Laying out the top end assembly components.
4 brass head stud washers, 4 head stud nuts, connecting rod needle bearings, gasket set (top head gasket, cylinder base gasket, reed valve gasket and a new exhaust O-ring),  New wrist pin (or piston pin), 2 c-clips for wrist pin, piston, piston ring, Warren 2 cycle oil for assembly lubrication, cylinder head, reed valves, carb base, vent hose.


The cylinder has been bored and honed to size and decked (decking makes sure that cylinder head mounting surface is flat for good sealing). I failed to show the bottom of the cylinder so you can see the chamfering which allows easier installation of the piston and ring into the cylinder. Even though the cylinder looks good and clean you need to wash it thoroughly with dishwashing soap to make sure all the honing grit and minute metal shavings are gone. You can be sure it's clean when a clean dry rag wiped in the cylinder comes out clean.


Next, install the piston ring into the top of the cylinder before installing it on the piston. You need to do this to check your ring end gap.

To square the ring in the cylinder use the top of the piston to carefully push it (ring) down a quarter of an inch to half and inch in the bore.


Remove the piston and use feeler gauges to check the ring gap. Minimum ring gap is .004" thousandths of an inch per inch of bore. (A one inch bore would be .004" a 2 inch bore would be .008" and a 3 inch bore would be .012". In other words multiply the size of bore X .004" to get your ring end gap.
In our case the bore is right around 1.9288 so we round it up to 2 inches X .004" and we get .008" ring gap.


If you need to open up the ring gap, place a small metal file in a vise to hold it secure. File in one direction only (don't double file which is staying in contact and rubbing the ring up and down the file without losing contact with file). Take your time and check often.


Using a ring expander tool install the ring on the piston in the groove making sure ring gap is at the small pin in the ring groove. You can install a ring without using the tool but you can break the ring if not careful, twisting the ring during installation will more likely break it. Use the tool. The Wiseco racing piston for our YZ80 only has one ring. Some pistons have two or three rings.


Take some  2 cycle oil and coat the cylinder walls using your finger. Barely visible in the photo can be seen the cross hatch pattern left from honing cylinder walls. Set the cylinder aside.


You don't have to but generally I like to install one of the piston pin clips in the piston before final installation. These clips can be a bugger to wrestle with so having one already done aids in the installation of final assembly of piston onto the rod.

Coat with 2 cycle oil and install the needle bearing race into the rod (not shown) carefully place the piston over the rod (making sure piston is in correct orientation). Coat piston pin with 2 cycle oil and insert through piston and rod until it stops against the clip on other side. This is where the one clip already installed in piston helps out. When pin is seated all the way in you should see the other groove for the second clip. Now install the other c-clip into the groove by putting one open end inside the groove and hold it tight against the piston while using a small flat blade screw driver to gently pry the remaining part of clip into the groove. Make sure it is seated completely in the groove using the screw driver to push it snug up to the piston pin, you should hear it snap in.


Below you can see the base gasket sticking out from under the blue shop towel. You can put it on after the piston is on the rod but I like to do it before so I don't forget as I did by not showing it earlier to you. The shop towel is to catch any parts down in engine during assembly of the piston to the rod. Those little clips like to spring off sometimes when you try to get them in the groove. you don't want that bugger going down in the engine.

Carefully slide the cylinder over the studs and down on the piston. Pinch the ring into the groove and slide cylinder down. The chamfer on underside of bore aids in guiding the ring in the cylinder. Don't force it, take your time. As soon as the ring enters the cylinder the piston will glide right in.
Next install the head gasket noting in the repair manual the correct orientation to insure coolant can flow properly. Also note the small arrow engraved in the piston top at left side of piston in picture. This is so you know the piston has to be installed with arrow pointing towards front of engine. If not then your ports in cylinder and ports in piston itself will not line up, you will quickly burn the engine up if not installed in correct orientation. More over the engine probably won't even start.


The cylinder head has two (On this YZ) hollow locating pins, they do not allow coolant to flow. The gasket holes where the locating pins go are not large enough on this set at least. The paper was cut away from hole circumference where the pins go to allow head to seat using a slightly larger sharp drill bit that is the same size as the outside diameter of those locating pins.


Install the head on ( you may need to tap it with a rubber or plastic tipped hammer. Do not use a metal hammer please). Install the four copper washers on the studs and then the nuts of course. Use a torque wrench to tighten nuts in two stages. Tighten all in a crisscross pattern to 9 ft lbs, then tighten all four again to 18 ft lbs in the second stage. If the head is not going down evenly stop and check to see what might be causing it to bind.  Check the operation of the piston for binding using the kick starter by hand. It should move with ease without a spark plug installed. It should move up and down in cylinder nice and smooth. if it does then your good to go.

Sunday, April 27, 2014

Cylinder head and Cylinder

Getting Cylinder Head and Cylinder Back In Shape


Below is the very chewed up cylinder head. We were told a washer got sucked into the combustion chamber from the exhaust. I don't see how that happened, but nonetheless, something got in there and did some nasty work. With a price of around $103 for a new one we need to save this one.


After a bit of work we're able to salvage this head. Some lapping compound should have us good again.


Thankfully the bore has no damage. Need to clean off the old gasket and prep for boring and honing to fit a new piston. 


After removing the bulk of old gasket with a gasket removal tool, we use a brass wire wheel to remove the remainder. Only use a brass wheel and not a steel wheel. A steel wheel will gouge and take off metal and we don't want that to happen. A brass wheel is softer and will only remove the gasket material.


Here is the crank case side of things, looks all good to go for cylinder boring. If it will be a week or more before you get to boring the cylinder, such as having to wait for new piston to arrive, soak the cylinder walls down with something like WD-40 to keep rust at bay.


Our piston kit awaiting it's trip to the boring machine. You need the piston before you have any boring or honing done to insure a proper fit. To little material removed from the bore and it will seize piston, to much and piston will rattle. You have to match the bore to the piston

Sunday, April 20, 2014

Make it shine, Cleaning up the white YZ Number Plates

Making those old Plastic Number Plates Shine
I got a little ahead of myself on doing the number plates, so had to take a picture of both the finished one (Top) and the one not touched yet.
(Use rubber exam or mechanics grade rubber gloves for this)
First clean it up with soapy dish liquid to get most the crud off. Next hit it with some simple green and scrub with some scotch bright vigorously, get into those nooks and crannies. For the crevices around the spot were the numbers go use a razor blade tip to carefully clean out the grime around the circumference. Be very careful using the razor blade tip as you don't want to cut into the plastic, just scrape. Now with the razor blade held at a ninety degree angle scrape the entire surface with light enough strokes to just shave fine shavings. Soapy water will aid in the process of the blade to glide if you wish. Remember, your not digging into the plastic, just shaving it. This gets rid of the "dead" plastic and helps to remove scratches.
Clean up with clean water, I use a spray bottle to do this and wipe down with a blue shop towel. Next use some Wesley's Bleach white and soak it good, allow to sit a minute or two and then scrub again with the scotch bright pads. Wash again with clean water. Now your ready for the next steps.


Here is where the fun really starts. Begin with 220 grit wet and dry automotive sand paper. All the grits of sand paper you will be using are wet and dry. Wet the plastic panel and paper and sand the whole panel, even the edges. Pay attention to the deeper scratches but don't concentrate to much on them, you want them to level with the rest of the surface and not groove them out. The surface should be dull looking all over and you will see sanding scratches on the surface, not to worry, you'll take care of this. Wash with clean water. Take the 400 grit wet/dry and go over the whole surface yet again. Wash off and move to 600 wet/dry, then 800 wet/dry but using the simple green as your wetting agent instead of water. Wash it and dry the panel off, the sanding scratches should all be almost gone now. If not hit it with the 800 some more keeping the sanding direction straight line as possible. Next up is to fine sand with 1000 grit wet/dry, making sure to keep surface and paper wet, check your progress. It should be a very smooth surface now with little if any sanding scratches left. Mind you it will be smooth and a tad shiny but not gloss shiny...yet. See picture below.  

Now that you are here you may want to get the good plastic shine back, or you might be happy with the look above. It's up to you. To get a nice new plastic shine on you need to use automotive polishing compound (I use Turtle wax polishing compound), this is what gets rid of the rest of the scratches and gives that deep luster shine. Read the directions on the container, you apply it with a foam pad rubbing it in a straight line back and forth direction, not swirl it in round like paste wax. Take a terry cloth or some sort of clean cotton cloth and buff it back and forth. It should be to a high glossy shine now when your finished. More than one application might be to your liking.
At this point I put on some Carnuba wax which will pull the high shine back down a notch and to give some protection. In direct sunlight without the wax the reflection will be pretty hard to look at. 


Saturday, April 19, 2014

YZ80 White Gas Tank Refurbish


Make That Dingy White Gas Tank White Again

Here is the dingy white gas tank from the YZ80. It is stained with a muddy color that is difficult to remove. I researched all over for a solution to bring back the whiteness and read it is stained from the inside out from fuel.  Now here is the thing, even after a another bike repair shop told me the same thing I wasn't exactly convinced of this as being fact. You see, there is this chemical - Bromine - that is released from plastic that is a flame retardant. Yellowing comes from the bromine over years as it .. well here is a link to read up on it that is more in-depth so I don't have to try and explain it all. It answers my question better because the under side of the tank is not yellowed which made me suspect something else was going on. This after I had tried many products to get this tank white again.   http://www.exisle.net/mb/index.php?/topic/59657-de-yellowing-plastic-the-stain-isnt-permanent-after-all/


 This is a picture of the tank before I started trying all the cleaning suggestions I had found.
 Here is the right side after multiple hours and trying different products. It's a ton better than it was to begin with and damned near white again. First I cleaned the tank all over with bleach, filled the inside all the way up with diluted bleach and let it sit for an hour. Then poured out the bleach and washed off the outside. Next I took a razor blade, held at a ninety degree angle, using firm strokes and smoothed the surface of most scratches in the plastic. Next, sprayed on some Wesley's Bleach white and let that soak for about ten minutes, sprayed on some more and hit that with scotch bright pads. Next, wash that off and use some 400 wet dry sandpaper and sand it smooth, then apply some rubbing compound just as you would a car, then hit with 400 wet/dry again making sure to keep it wet. Apply Wesley's again multiple times. I tried soft scrub and simple green as well. I did notice after the simple green that there were some places where it had taken more of the yellowing out. I keep repeating this process many times, if it was sunny outside I would spray on the Bleach White and let it sit in the sun for awhile letting the UV rays help, but of course it's been raining or overcast for two days.


Here is the left side of the tank, it isn't stained as bad and leads me again to believe it is the Bromine and not the fuel that causes these stains. Remember, Bromine is a dark reddish brown liquid at room temperature and that is what you see on your tank. I'll finish up sanding with progressively finer grades of sand paper, 400, 800, 1000 and finish with 2000 grit paper for a smooth finish.

Here it is after all the above mentioned process done to it, much, much better but still not what I'm after. Spray s bit of water on it and the ghost of the stain can still be seen. There is a solution gamers have used to restore old plastic game systems and toys back to white called Retrobright, might give that a try.

Saturday, April 12, 2014

Project YZ80 Restoration

Yamaha YZ80 Restoration

Vintage Motorcross racing motorcycles are making their way back into the mainstream again. My brother and have teamed up to renew/restore as many of them as possible. This is something fairly new to him, though I have brought a few vintage rides back from the near grave before. I also have a master small engine degree under my belt that has been utilized from time to time. My brother on the other hand has his experience more with removal and reinstallation of car engines and repairing a farm tractor a few times, he's no stranger to tools and knows his way around a wrench. He's also brought an old Honda V65 back from the clutches of the motorcycle reaper.
Here we are going to take this Yamaha YZ80 from it's worn out status, renew and restore it back to it's former glory. This is a 1990 YZ80A that among other small things needs a new top end.
 Creation of this blog is from finding very little information on the web on these bikes, most sights are dedicated to the big brothers of the YZ brotherhood. We enjoy the larger YZ's as well but just thought the little brothers needed a place to be recognized. Join us as we fix, repair, replace, search for elusive parts and make this bike scream again.      


When we picked this YZ80 up it was covered in red dirt and grime, so off to the carwash to clean some of it off.


 A ton of the grime was washed down the drain giving us a better look at what was underneath.
                    
There are more parts in the truck that go on the bike of course
 Being that the cylinder had already been removed by the previous owner we had seen the damage to the top end. Problem was, the piston was not there to inspect but the head was. Someone had done a ring job and evidently, somehow, a washer got in on top of the piston and punched a hole in it. I'm guessing by the cylinder head condition; that and the fact we were told there was no compression what-so-ever. The grandfather had given us some helpful information on that piston, he said it only had the one ring piston in it. To me, that would mean it was the factory sized piston.  His grand kid, it comes to light, took the piston with him as a souvenir.

Couple of things to note here, piston jobs are a common occurrence. Normal wear and tear, dirty air filters, wrong oil gas mixture can all lead to a piston failure. It's going to happen at some point. The cylinder, luckily, has no score marks nor damage at all, we might be able to hone it, perhaps go one size up, we'll see after taking some measurements. Look close at the engine clutch cover, it has a groove worn in it from the shifter which has been bent in slightly. No big deal there really, just time to repair both.   

As stated before, the wash did away with a lot of the grime. A yellow plastic cylinder cover is used here to keep most the water  out of the engines bottom end while being subjected to high pressure to remove that nastiness.